Friday 9 January 2015

Rotating knives? Nelson Convention 2014

One of the workshops I completed is this wonderful rotating kitchen, c/w knives.  The kit came with a whole box of lovely goodies to fill up the shelves etc, and when I got home, I found a few more!

Note the tiny little ornament of a Spanish flamenco dancer.  My dad brought me home a similar one, tho much bigger of course, dressed in yellow satin, when I was a little girl, so I put the yellow tiny one into this kitchen.  I bought a box of 6 (count them, six!) from a railway modelling shop in Spain the year before last.

The tiny little house on the shelf near the Spanish dancer is a paper printie found online, sorry, I cant remember where from.

The little picture in a frame, over the doorway, is a sticker from a Japanese gift shop.

The skull on the windowsill is a bead, thought I'd weird things up a wee bit...

The little box of Perlas baby potatoes, on the floor by the chair, is a popular brand in New Zealand, and came in the goodie bag at the Convention, thank you very much!  We had Perlas with the Xmas turkey, as usual.  There's another box tucked away on the bottom shelf of the counter.

The little white kitten is one of those silicon rubber toys, I found that one in Smith & Caughey.  The cat food box and the food dish came from Thailand, brought back by my friend Fiona, and cheap as chips, apparently, from a market stall of miniatures to die for.

The conch-type shell was from a packet full that I bought to use in the display table workshop.

The little wooden jar on the shelf over the window sill was in a box of "junk" stuff at Convention, rifle through the box and fill a scoop for a dollar.  Bargain!  I got lots of Goodies in that, Lauren and Tania will see, so they will.

The mug of wooden cooking utensils, on the windowsill, were in the goodie bag from the Dunedin Convention in 2012.  The mug looks like the cap of a felt tip pen to me.  One person's rubbish is another person's treasure, isn't that right, Simone?

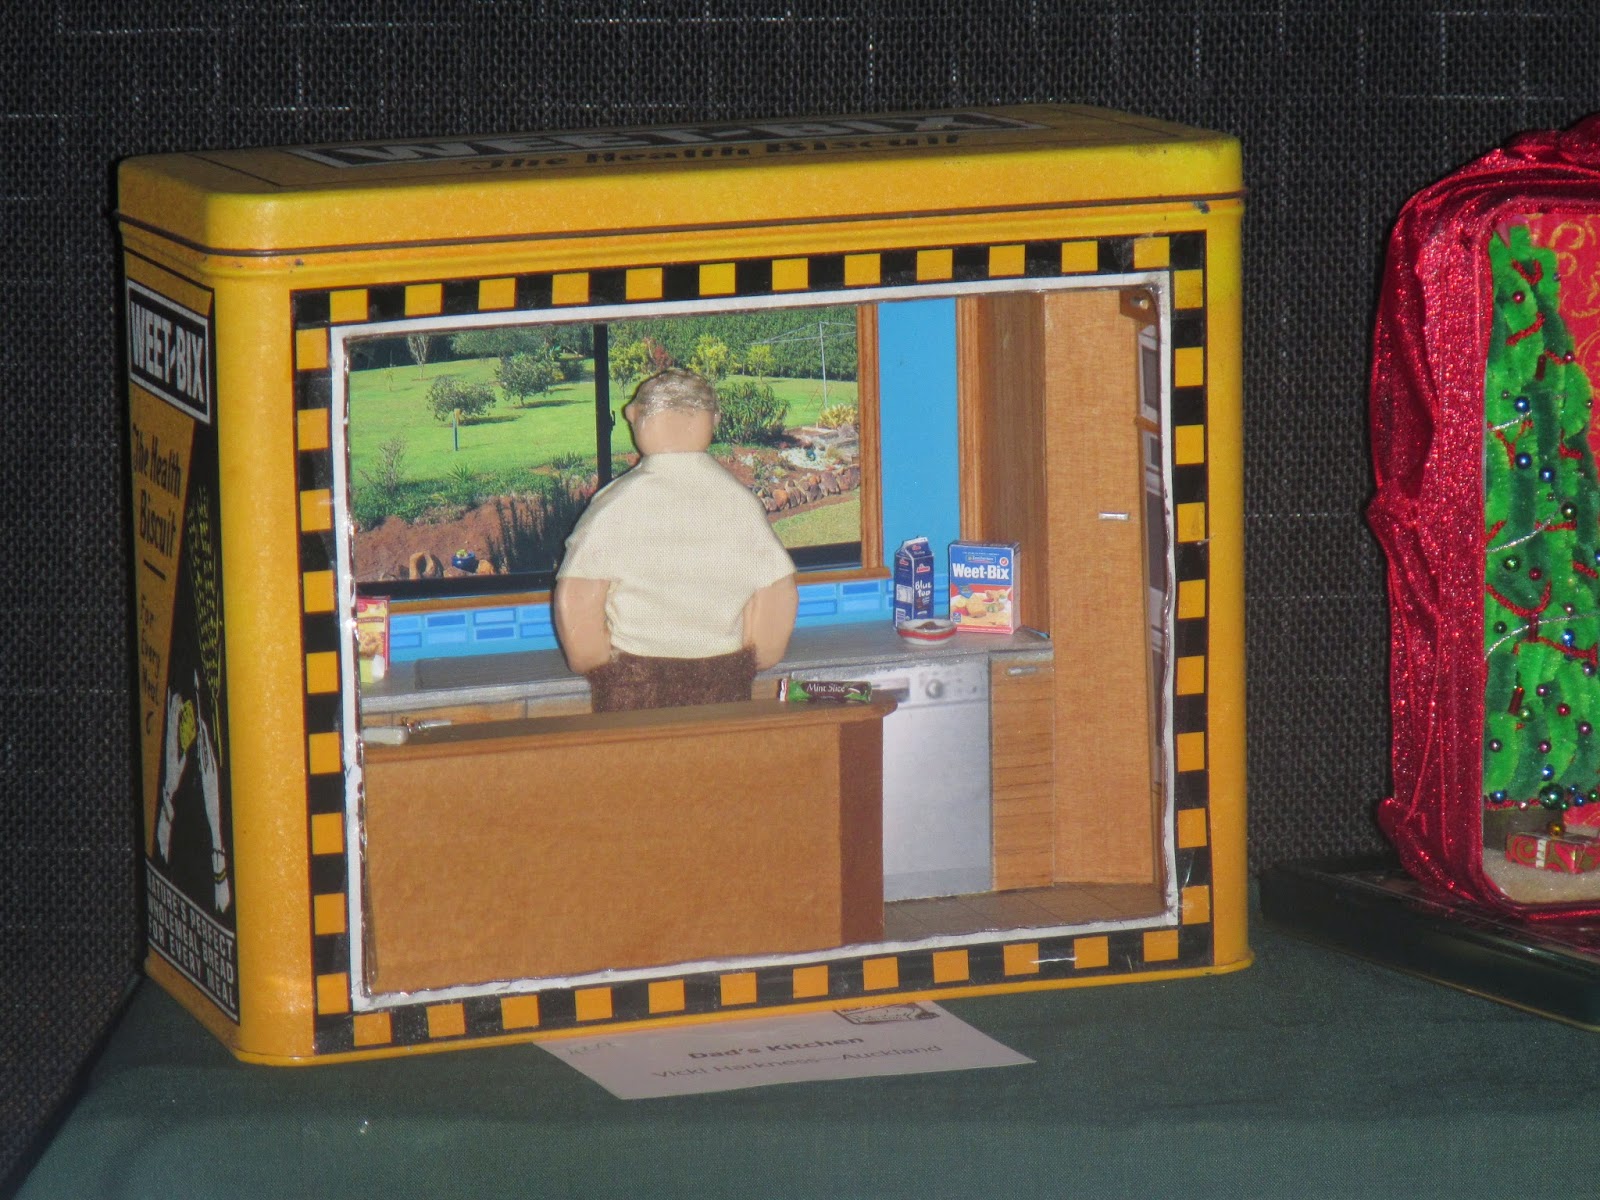
On the porch side, the gumboots have since been nicked and used in the Christmas Potting Shed, so I will need to find some more.  I went looking for Barbie shoe and boot sets, I used to see them in the toy shops, but I couldn't find any when I went to look.  Ho hum...


PS see the birds nest over the window on the verandah?  Hee hee!


Friday 19 December 2014

Secret Santa gift - a Christmas Potting Shed scene

I found this cool lantern at K-mart.  I immediately had ideas...  I bought one, then went back later and bought several more.  SUCH a useful thing!

I masked the exterior, then spray painted the interior.
Then I started the gold leafing on the outside
In progress:

First you paint the outside with the goop in the pot, this is gilding milk.  Sounds revolting...

Leave to dry until tacky, about 20 minutes depending on the surface of the object.  The fun starts when you take the goldleaf sheets and start to apply them to the goopy areas.  The stuff has a mind of its own.  Bit by bit apply small areas of gold leaf to the object, and use a medium soft paint brush to brush over the area and make the leaf adhere well to the goop.  If the goop dries, it can be re-applied, and then more goldleaf can be added, to patch any areas that get missed. 

The final effect is so much nicer than just gold paint:
I made the brick patio floor by cutting a paper template, then a piece of board.  I marked a diagonal line to set the direction of the bricks, and started spreading glue, a smallish area at a time, and applying the bricks.  I wasnt too fussed about the bricks fitting closely, as I wanted to have weeds growing through.  Just as well, as they werent terribly evenly made.


Once the bricks were laid, I pushed glue into some of the wider gaps, and then sprinkled model railway scatter over the whole area.  I applied glue to the edges too, as I wanted a fairly weedy look to the edges!


I asked my hubby if he liked the effect, he said, no, cos he just spend the whole afternoon removing weeds that looked exactly like them from our driveway... I am thrilled with it though, and am planning the next project to be able to do it again!

I assembled various goodies from my stash, stained the wooden crates and the potting bench, mucked up the shiny finish of the gardening tools, added "dirt" to the seed trays and various places, and then glued all the bits in place.

This is the front view of the finished product:
 I also had a string of star shaped Christmas lights, with a battery and switch unit, that I hung from the chimney area:

One of my favourite bits is the dandelion:

Sorry, not a very good picture.  This was made in Inge's dandelion workshop.  Too cute!

So that's it, The Christmas Potting Shed.


Monday 17 November 2014

Post-Bon Appetit Washing Up

For the NZAME conventions, all the minis clubs make goodies for the goody bags.  It's so much fun to receive a bag, FULL of wonderful miniatures, as you register!  Our Club made kitchen implements for the Nelson 2014 Convention.  The theme being Bon Appetit, we thought there would be plenty of washing up afterwards, so we created dish-wash sponge and bottle brush sets, on a handy hanging rail, in 1/12th scale.  The design and materials were provided by Alie, and once we had made 9, we made the 10th one to keep for ourselves.

I have a 1/12th scale kitchen, and it seems as though it is never quite finished, there is always room for more, however full it seems.  This washing-up set has gone into the kitchen, and looks perfect. 

Thursday 13 November 2014

Convention round table workshop - tea bag display box

This is a laser cut kit, by Adelaide Cann.  It's very small...


Re-purposed food tins

As part of our club display, North Shore minis had several food tins.  Mine was the famous sake bar, and here are some of the others. 


There's more than one...

of me.  I met a new friend at the Convention.  Here are Valmai and Valmai:


NZAME Convention workshop : gold leaf demi-lune table

It's difficult to say which was my favourite workshop, but this one was able to be completed in the morning workshop, and that's smashing.  It wasnt difficult, but we certainly learned some useful stuff, and since I am planning to give a workshop of my own using gold-leafing, it was fortuitous to be able to actually try it out!

Materials provided included the table, gold leaf, and the goop to stick it with, and the makings of the little accessories.  I particularly like the lipsticks!  Teensy Weensy!

We painted the table with the goop, and let it dry.  Then we laid the gold leaf on, and brushed it fairly firmly with a soft brush.  Gold leaf is very thin and filmy, and has a mind of its own.  It sticks everywhere the goop is, and flakes and spreads itself over everything else with a meter.  I even inhaled some.

The mirror needed to be glued with special glue that doesnt remove the mirrored backing, I need to get me some of that for the future.  The little vase is 2 jewellery findings, held in place with a pin while the glue dries, then the flowers added.  I dont like how I've done the cardboard stand at the back of the mirror, so I might cut that off and replace it.  Or not.  Anyway, here it is, and the extra table I bought, so as to make a pair.  I am planning to use them in a Lady's Boudoir.  Watch this space.


NZAME Nelson convention over Labour weekend October 2014

The weather was perfect.  The Convention was most satisfying!  I did four workshops, on the Saturday and Sunday mornings and afternoons.  Also, I bought several of the round-table kits offered on Monday morning.  And I have finished everything!  Howzat?!?!  This has never happened before, I can tell you.  We went mob-handed from North Shore Minis, and looked wonderful at the Convention dinner, in our guise as a Club Sandwich.  I was Lettuce And Pickle, With Herbs And Spices.  Here we are:


Dont we look smart?  in case you didnt know, we are Beetroot, Cheese, Lettuce And Pickle, Banana, Bacon, Tomato, and Scrambled Egg.  Also Sliced Boiled Egg, Ham, Asparagus Roll and A Chili Pepper.

Monday 20 October 2014


The Asahi can sake bar is finished, just in time.  The counter is a toilet-roll tube, covered with a bamboo coaster.  The counter top is cut from the same thin 2-ply wood from the wine gift box, cut using my sewing scissors, which will never be the same.  The sake flask is a jade bead, and the sake cups are also beads, that I have had forever.  The Asahi beer cans at the back of the counter didnt get their handles, I might add them later.  The little Japanese lucky cat is one of three I brought back from Tokyo a couple of years ago.  On the wall inside is a folded paper geisha, which was a decoration on a fancy pair of chopsticks in a nice paper wrapper, given to me by one of my Japanese home-stay students, and the paper of the chopsticks wrapper was used to wrap the sake barrels on the floor of the bar.  The lights in the ceiling are stuck through holes poked in a piece of cardboard, not very beautiful, but easy to take in and out to change batteries etc, and anyway, they cant be seen unless you turn the can upside down and try really hard!  The wires are taped on the top side, and the light-switch is just above the doorway, easy to reach to turn on and off.  I might add more lights, it isnt as bright inside as I first thought.  The lights are good for 200 hours of continuous use, so good value, dont you think?!


Monday 15 September 2014

Japanese sake bar in Asahi beer can

For our club display at the minis convention in Nelson, we have made displays in food tins of various kinds.  I wasnt feeling inspired by biscuit tins and chocolate tins and cracker tins etc.  Then I came across a 3 liter Asahi beer can, when having dinner in a local Japanese restaurant.  Bingo!  Here is the can:
Then I cut out one of the panels on the side:

I had a round wooden presentation box for wine bottles, with a flexible sheet of wood, and I cut the bottom and top off, leaving a useful sheet of wood.  I cut a couple of panels out of that:

These will be painted and glued to the inside of the tin, either side of the doorway.


I cut the rim off a tin lid, a very pretty tin, but just taking up space in my pantry.  Actually, hubbie cut it off, using my Dremel. 

I found cork stickers in the scrapbooking shop, and used them to tile the inside of the tin lid:


The tin will need a strip of something for the skirting board, to go inside the lip of the tin.

In Daiso, the Japanese $2 shop (actually $3.50...) I found fridge magnets.  The wine bottles arent 1/12th scale, as wine bottles, but as sake bottles, they are just the right size!  Here are the fridge magnets:


 I pulled the bottles and the fruit and veggies out of the wooden crates, and gouged the magnets off the back.  I am left with a dozen very useful wooden crates, of a good size for some other scene, some extremely weird vegetables, mostly un-usable, 24 perfect sake bottles, and a couple of bleeding wounds on my left hand, where the broken screwdriver slipped:

I have found some sake bottle labels on the i-net, and will stick them onto the bottles for my bar.  There are several different colours of bottles, pale yellow, some rose looking ones, and some dark ones.  That's fine, as sake comes in all different colours, as I found when doing some research in a Japanese restaurant.  Honestly.  Research.

The next thing is sake barrels.  I found a place (long live Google) where I could buy new sake barrels, if I wanted to make my own sake.  I could do that, I made my own wines before now.  They even won prizes, at the agricultural show!  In Zambia.  Anyway, that was a good place to see how a sake barrel really looks, and I can use some napkin rings, that I found in the Op Shop, that are just about the right size.  Good thing too, they are ugly as sin, and I didnt know what else to do with them:
So I have also printed out some images of sake barrel labels, and will then add the soft white rope which traditionally ties up the barrels.